Kode Rahasia Umum Symbian
*#06# Melihat IMEI
*#0000# Melihat Versi sofware
*#9999# Melihat Versi sofware
*#7370# Soft Reset
Untuk Hard reset: Tekan Tombol hijau, 3 dan * ditekan bersamaan, tekan tombol power. Password standar 12345
*#92702689# Melihat info tanggal perbaikan
Kode Rahasia Umum Java
*#7380# Reset atau Restore Factory Setting Nokia seri 40
*#7370# Reset atau Restore Factory Setting Nokia seri 60
*3370# Untuk restart ponsel Nokia 3310
*#7220# Mengaktifkan GPRS PCCCH
*#3925538# Menghapus Wallet di ponsel Nokia 6610,63101, data Wallet terhapus semua
*#67705646# Menghapus operator logo di ponsel Nokia 3310 & 3330
Operator GSM
Selain kode rahasia yang ada di ponsel, operator GSM juga memiliki kode rahasia untuk layanan yang diberikan pada pelanggan.
Call Diverting/ Call Forward/ Pengalihan Semua
* * 21* NUMBER # [SEND] Mengaktifkan
# # 21 # [SEND] Membatalkan
* # 21 # [SEND] Melihat status
Call Diverting/ Call Forward/ Pengalihan bila tak ada jawaban
* * 61 * NUMBER # [SEND] Mengaktifkan
# # 61 # [SEND] Membatalkan
* # 61 # [SEND] Melihat status
Call Diverting/ Call Forward/ Pengalihan bila dilu-ar jangkauan
* * 62 * NUMBER # [SEND] Mengaktifkan
# # 62 # [SEND] Membatalkan
* # 62 # [SEND] Melihat status
Call Diverting/ Call Forward/ Pengalihan bila sibuk
* * 67 * NUMBER # [SEND] Mengaktifkan
# # 67 # [SEND] Membatalkan
* # 67 # [SEND] Melihat status
# # 002 # [SEND] Membatalkan semua pengali-han
Diverting Data/ Forward Data/ Pengalihan semua data
* * 21 * NUMBER * 25 # [SEND] Mengaktifkan
# # 21 # * 25 [SEND] Membatalkan
* # 21 # * 25 # [SEND] Melihat status
NOKIA
Nokia 9300/ 9500
*#170602112302# Melihat versi software
*3370# Memakai tenaga baterai cadangan
#3370# Menon-aktifkan Enhanced Full Rate Codec ( EFR).
*#4720# Mengaktifkan Half Rate Codec.
#pw+1234567890+l# Melihat status Provider Lock, (tekan * untuk simbol p,w +)
#pw+l 234567890+2# Melihat status Network Lock, (tekan * untuk simbol p,w +)
#pw+1234567890+3# Melihat status Country Lock, (tekan * untuk simbol p,w +)
#pw+1234567890+4# Melihat status SIM ‘Card Lock, (tekan * untuk simbol p,w +)
*#21# Melihat semua panggilan yang dialihkan.
*#2640# Menampilkan Security Code.
#30# Melihat Private Number.
*#73# Reset the Phone Timers.
*#746025625# Menampilkan status SIM Clock.
*#7760# Manufactures code.
*#7780# Restore factory settings
*#92702689* Melihat garansi posnel
(*#WAROANTY#)
Tekan & tahan tombol “Shift + Ctrl + F dan tombol Power Soft Reset

Nokia E60
*#92702689# *#warOanty# Melihat IMEI. Tanggal pembelian, tanggal servis.
*4720# (*hraO#) Mengaktifkan Half Rate
#4720# (#hraO#) Menon-aktifkan Half Rate
*3370# (*efrO#) Mengaktifkan Enhanced Full Rate
#3370* (#efrO#) Menon-aktifkan Enhanced Full Rate
* #746085685* (*#simOclock#) Melihat sta¬tus SIM lock
*#7220# (*#peaO#) Mengaktifkan GPRS dan dukungan Packet Common Control Channel (PCCCH)
*#7230# (*#pcdO#) Menon-aktifkan GPRS dan dukungan Packet common control channel (PCCCH)
*#7760# (*#ssnO#) Melihat nomor seri pabrikasi
*#2820# (*#btaO#) Melihat alamat Bluetooth MAC
*#7370925538# (*#resOwallet#) Reset the Mobile Wallet, data akan hilang semua
Nokia E61
Tahan # Berganti profile dan mode diam.
Tombol fungsi biru + Ctrl Mengaktifkan Bluetooth
Tombol fungsi biru + Chr Mengaktifkan IR
Ctrl + C Copy
Ctrl + X Cut
Ctrl + V Paste
Ctrl + Joystick Down Page Down (turun satu halaman)
Ctrl + Joystick Up Page Up (naik satu halaman)
Shift + Joystick Left or Right Menyorot satu lurus
Shift + Ctrl + Joystick Left or Right Menyorot satu kata
Ctrl + Joystick Left or Right Menggerakkan cursor diantara kata
*#2820# Melihat alamat Bluetooth
*#62209526# Melihat alamat adapter WLAN MAC
*#92702689# Melihat usia ponsel
Nokia E65
*#92702689# *#warOanty# Melihat IMEI. Tanggal pembelian, tanggal servis
*4720# (*hraO#) Mengaktifkan Half Rate
#4720# (#hraO#) Menon-aktifkan Half Rate
*3370# (*efrO#) Mengaktifkan Enhanced Full Rate
#3370# (#efrO#) Menon-aktifkan Enhanced Full Rate
*#746085685# (*#simOclock#) Melihat sta¬tus SIM lock
*#7220# (*#pcaO#) Mengaktifkan Half Rate
*#7230# (*#pcdO#) Menon-aktifkan Half Rate
*#7760# (*#ssnO#) Mengaktifkan Enhanced Full Rate
*#2820# (*#btaO#) Menon-aktifkan Enhanced Full Rate
*#7370925538# (*#resOwallet#) Melihat status SIM lock
Nokia E70
*#btaO# Melihat alamat Bluetooth
*#macOwlan# Melihat alamat adapter WLAN MAC
*#oprOlogo# Menghilangkan logo operator
*#pcaO# Mengaktifkan logo operator
*#pcdO# Menon-aktifkan GPRS dan dukungan Packet common control channel (PCCCH)
*#simOclock# Melihat status SIM clock
*#170602112302# Melihat versi software
*#warOanty# Melihat kode garansi
#pw+1234567890+n#
n = 1
n = 2
n = 3
n = 4 Menampilkan status SIM lock
provider lock
network lock
country lock
SIM lock
Nokia N80
*#92702689* *#warOanty# Melihat IMEI. Tanggal pembelian, tanggal servis
*4720# (*hraO#) Mengaktifkan Half Rate
#4720* (#hraO#) Menon-aktifkan Half Rate
*3370# (*efrO#) Mengaktifkan Enhanced Full Rate
#3370* (#efrO#) Menon-aktifkan Enhanced Full Rate
*#746085685* (*#simOclock#) Melihat sta¬tus SIM lock
*#7220# (*#pcaO#) Mengaktifkan dukungan GPRS dan Packet Common Control Channel (PCCCH)
*#7230#. (*#pcdO#) Menon-aktifkan dukun¬gan GPRS and Packet common control channel (PCCCH)
*#7760# (*#ssnO#) Melihat nomor seri pabrikasi
*#2820# (*#btaO#) Melihat alamat Bluetooth MAC
*#7370925538*. (*#resOwallet#) Reset the Mobile Wallet
Nokia N91
*#06# Melihat IMEI.Tanggal pembelian, tanggal servis
*#0000# Menampilkan versi firmware dan tanggal
*#btaO# Melihat alamat Bluetooth MAC
*#oprOlogo# Menghilangkan logo operator
*#pcaO# Mengaktifkan dukungan GPRS PCCCH
*#pcdO# Menon-aktifkan dukungan GPRS PCCCH
*#resOwallet# Reset the mobile wallet
*#simOclock# Menampilkan status SIM clock
*#ssnO# Menampilkan nomor seri pabrikasi
*#warOanty# Menampilkan garansi dan servis
*efrO# Mengaktifkan encoding EFR
#efrO# Menon-aktifkan encoding EFR
*hraO# Mengaktifkan encoding HR
#hraO# Menon-aktifkan encoding HR
#pw+1234567890+n#
n = 1
n = 2
n = 3
n = 4 Menampilkan status SIM lock
provider lock
network lock
country lock
SIM lock
Nokia N93
*#92702689* *#warOanty# Melihat IMEI. Tanggal pembelian, tanggal servis
*4720# (*hraO#) Mengaktifkan Half Rate
#4720#* (#hraO#) Menon-aktifkan Half Rate
*#3370# (*efrO#) Mengaktifkan Enhanced Full Rate
*#746085685* (*#simOclock#) Melihat status SIM lock
*#7220# (*#pcaO#) Mengaktifkan dukungan GPRS dan Packet Common Control Channel (PCCCH)
*#7230# (*#pcdO#) Menon-aktifkan dukung¬an GPRS and Packet common control channel (PCCCH)
*#7760# (*#ssnO#) Melihat nomor seri pabrikasi
*#2820# (*#btaO#) Melihat alamat Bluetooth MAC
*#7370925538# (*#resOwallet#) Reset Mobile Wallet
Nokia N96
*#92702689# Melihat umur ponsel
*#62209526# Alamat Wireless MAC (M A C _ WLAN)
*#2820# Alamat Bluetooth MAC (B T A 0?)
*#7370# Format Soft Reset
*#7780# Factory Reset/ Hard Reset
SAMSUNG
Untuk membuka kode ponsel Samsung, dapat dilakukan dengan cara posisi SIM Card tidak terpasang pada ponsel. Namun kode dibawah ini tidak akan berfungsi pada beberapa versi ponsel Samsung secara keseluruhan.
*#06# Melihat IMEI
*2767*5282# Java reset
*2767*63342# Reset media
*2767*927# Wap reset
*#9998*4357# Help menu
**9998*5282# Setting Java server
*#9999#0# Melihat monitor mode
*#9999# Sofware version
*#8888# Hardware version
*#9998*748# SIM info
*#9998*523* Contrast layar ponsel
*#9998*842* Vibration ON lalu tekan OK
*#9998*289# atau *0289# atau *#0289# Buzzer ON lalu tekan OK
*#9998*782* Menunjukkan tanggal & alarm
*#8999*638# Menunjukkan info network
*#9998*5646* Mengubah logo operator
*#9998*968* Menunjukkan nada untuk alarm
*#3243948# Digital audio interference OFF
*#32436837# Digital audio interperence
*#0001# Menunjukkan serial parameter
*#9998*228# Melihat kapasitas batera
*2767*2878# Custom EEEPROM reset
*2767*3855# Full EEPROM reset
*#9998*585# Non-Volatile Memory (NVM)
*#9998*76# Nomor produksi
*#9998*782# Menunjukkan tanggal dan jam alarm
*#9998*778# or *#9998*0778# or
*#0778# Daftar layanan SIM
*#9998*377# or *#9998*0377# Error log
*#9998*746# or *#9998*0746# or
*#0746# Sim Info
Samsung V200 & V300
*2767*63342# Unlock Code
*2767*3855# Unlock Code
*2767*2878# Unlock Code
*2767*927# Unlock Code
*2767*7822573738# Unlock Code
LG
2945#*# Test mode LG
2945*#01*# Menu rahasia
*#06# IMEI
*#07# IMEI and SW
*8375# Software version (LG B1200):
*6861# Recount cheksum (LG B1200)
*PWR 668 Factory test (B1200):
1945#*5101# Simlock menu (LG B1200)
2945#*5101# Simlock menu (LG 510W, 5200)
2945#*70001# Simlock menu (LG 7020, 7010)
2947#* Simlock menu (LG 500, 600)
BENQ SIEMENS
*#06# Versi software BenQ Siemens, lebih lengkapnya, tekan softkey beberapa kali
*#0001# Menu bahasa Inggris
*#0606# Kode rahasia, lepaskan SIM card lebih dulu
*#0003*(secret code)* Unlock Sim
*#0049# Menu bahasa Jerman
*12022243121 Layar tambahan
BENQ
C30 *#06# Cek IMEI
*#166*# Cek Versi Software C36 *#06# Cek IMEI
*#166*# Cek Versi Software T60 *#06# Cek IMEI
*#66*# Cek Versi Software E72 *#06# Cek IMEI
Mengganti bahasa ke default atau English *#0000# —> dial.
Mengganti bahasa dari English ke Indonesia: *#0062# —> dial.
* melihat kode negara
MOTOROLA
Pada ponsel Motorola terdapat symbol yang cukup aneh untuk fungsi Pause. Symbol [] (Pause) maksudnya tekan tombol * dan tahan hingga muncul tanda []. Masih banyak kode-kode lain yang ada. Jika angka terakhir dengan angka 0 maka kita dapat menon-aktifkan kode tersebut. Nomor tiga digit di bagian tengah dimulai dari angka 0 hingga 999. Kita bisa mengganti frekuensi menjadi 900/1800 den¬gan memasukkan tipe tertentu. Berikut ini langkah-langkahnya.
*#06# Melihat IMEI
Tekan bersamaan * 7 Kode untuk membuka tombol
[] [] [] 0 0 8 [] 1 [] Memilih line telepon – (gunakan untuk menulis sesuatu di bawah nama provider
[] [] [] 1 0 5 [] 1 [] Menambahkan phonebook di menu utama
[] [] [] 1 0 7 [] 1 [] Menambahkan pesan di menu utama
[] [] [] 1 0 8 [] 1 [] Copy memory SIM (menu phonebook)
[] [] [] 1 1 3 [] 1 [] Pilihan teknis (menu utama)
[] [] [] 1 0 1 [] 1 [] Slow (Frequency menu pen-cari)
[] [] [] 1 0 2 [] 1 [] Medium (Frequency menu pencari)
[] [] [] 1 0 3 [] 1 [] Fast (Frequency menu pen¬cari)
[] [] [] 1 1 9 [] 1 [] Mengaktifkan EFR
[] [] [] 0 0 4 [] 1 [] Mengganti Pin
[] [] [] 0 0 5 [] 1 [] Membuka blok menggu-nakan nomor PUK
Ponsel China
Seperti halnya ponsel branding, ponsel China juga memiliki kode rahasia untuk mengakses menu-menu rahasia. Ponsel China ini memiliki fitur seperti layar sentuh, dual kamera, dual sirh, dual baterai, dual charger dan fitur-fitur lainnya. Sebagian besar ponsel China memiliki software dan fitur yang sama, namun tampilannya saja yang terlihat berbeda.
1122, 3344, 1234, 5678 Kode default user
*#110*01# Mode teknis
*#987# Mode pabrik Factory mode
*#110*01# -> Device -> Set UART -> PS Config -> UART1/115200 Mengaktifkan port COM
*#987*99# Restore factory settings
*#369# Mengatur LCD contrast
*#800# software version
*#900# software version
*#0000# Send Mengatur bahasa standard
*#0044# Send Mengatur bahasa Inggris
*#001# Send Mengatur bahasa Inggris (firmware baru)
*#0086#, *#0886# Mengganti ke bahasa China
*#0084#, *#0966# Mengganti ke bahasa Vietnam


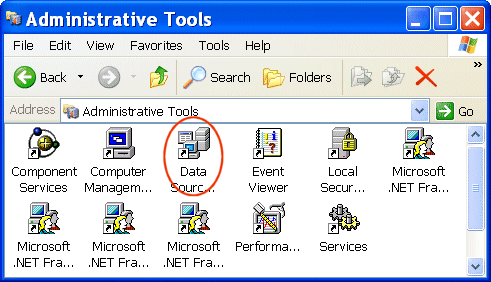


- Chkdsk / f checks the NTFS and file allocation table (FAT) file systems and then produces an error disk status report. It also quickly repairs disk errors or bad sectors found on volumes on the hard drive.
Run Chkdsk / f by going to the Start menu and selecting "Run." Type "cmd" at the command line prompt and then press Enter. This will bring up the Recovery Console. Next, type "Chkdsk c:/f" and then press Enter. - When volumes on hard drives are repaired, computer disk space is better utilized. Files are also retrieved faster. Running chkdsk / f is one of the fastest ways to check and correct disk errors.
- If the disk is not locked or if files are open, chkdsk / f will not be able to make necessary repairs. Furthermore, it can end up displaying a false report due to files remaining open or the disk not being unlocked. When this happens, a message prompt will give the administrator the opportunity to run the task the next time the computer is started. Options are to check "Y" for yes, or "N" for no. If "Y" is selected, upon restarting the computer, the task will automatically begin.
The disk drive can be locked by typing "Lock C" at the DOS command line. When the process is complete the "Unlock C" should be entered in the DOS command line. Administrator privileges are required to run the chkdsk / f command. - There is a risk of data loss after repairing a disk because the file allocation table has been altered during the process. It is a good idea to back up all data and create a recovery disk before running chkdsk / f. Select "Y" (yes) if a message prompt appears stating that units were lost and giving an option to convert those lost allocation units into files. They will be formatted with the file extension "*.chk."
-
 Another way of fixing disk errorsThe Check Disk tool scans for disk errors bypassing the command line. This is accomplished by right-clicking on the Start menu on the computer taskbar. Next, select "Explore." Right-click on the "C" disk drive or designated hard drive volume letter and then select "Properties." Go to the Tools tab and click "Check Now" under the Error-Checking section.


 ShareThis

